

For those who wish to take advantage of all the video editing features of LightCut on a larger screen with enhanced performance, downloading and installing LightCut on a PC using the BlueStacks emulator is an excellent option.
This process allows you to emulate an Android environment on your computer, making it easier to run mobile applications like LightCut, optimising the editing experience. Below, we’ll guide you through each step needed to carry out the installation effectively and make the most of this powerful editing tool.
Prerequisites for installing LightCut on PC with BlueStacks
Before proceeding with the installation of LightCut on your computer, it’s essential that your system meets certain basic requirements to run BlueStacks smoothly. This will ensure a seamless experience during editing.
Minimum system specifications
To ensure BlueStacks runs without issues, your computer should have at least:
- Operating system Windows 7 or higher.
- 4 GB of RAM minimum, although 8 GB is recommended for optimal performance.
- 5 GB of free disk space for installing BlueStacks and LightCut.
- An updated Intel or AMD processor to support emulation.
Stable internet connection
Make sure you have a stable and fast internet connection. This will make it easier to download BlueStacks, as well as the LightCut app from the Play Store once the emulator is installed.
A slow connection could hinder the installation process.
Download and install BlueStacks on your computer
The first step to installing LightCut on your PC is downloading the BlueStacks emulator. This software allows you to run Android apps in a Windows environment, making it easier to install apps like LightCut.
Although this guide focuses on Windows, the steps for installing and configuring LightCut on iOS are similar. Just follow the same download and setup process, adjusting it to your Apple device’s environment.
Access the official BlueStacks website
Open your web browser and go to the official BlueStacks website. This is important to ensure you download a secure and compatible version for your system.
Step-by-step: Navigate to BlueStacks.com and select the download button for Windows. The installer file will begin downloading to your computer.
Install BlueStacks
Once the file has downloaded, locate it in your downloads folder and double-click to start the installation.
- When the installer opens, follow the on-screen instructions. You can choose a custom installation location if preferred, though it’s best to keep the default.
- Be sure to enable access to the Google App Store for downloading LightCut later.
- Wait for the installation process to complete. Depending on your system’s speed, this may take a few minutes.
Configure BlueStacks to optimise LightCut
To ensure an optimal editing experience, it’s recommended to adjust certain BlueStacks settings before installing LightCut.
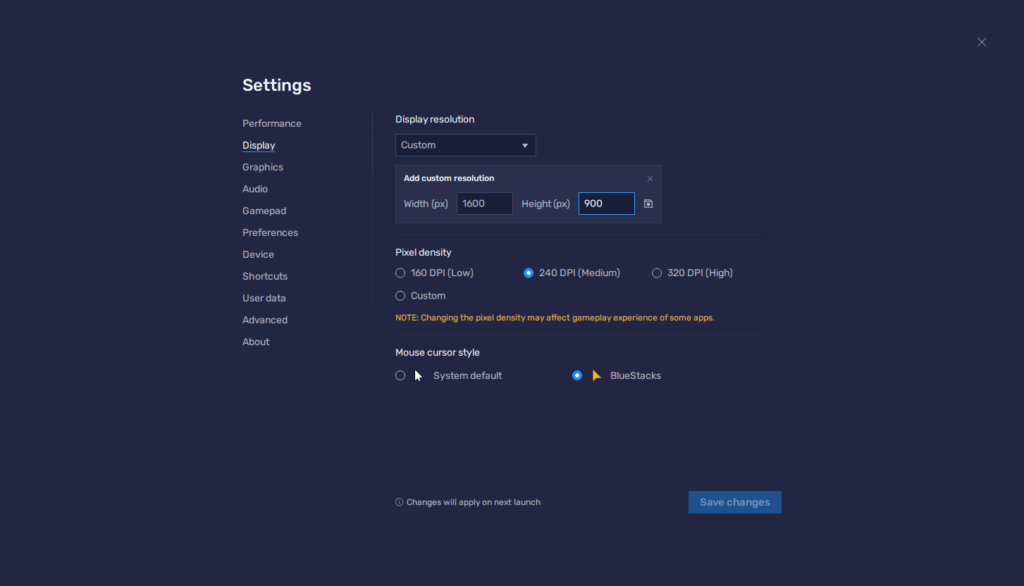
These adjustments will allow for smooth performance and help avoid possible lags or slowdowns.
Configure RAM and CPU core allocation
Access BlueStacks settings and go to the Performance section. Here, you can increase the amount of RAM allocated and the number of CPU cores used by the emulator.
- For video editing on LightCut, it’s recommended to allocate at least 4 GB of RAM and select the maximum number of available cores.
- This setting will enable LightCut to process and render videos more quickly and efficiently.
Select an appropriate resolution
In the same settings section, choose a resolution that allows you to clearly view the details of your edits. For PC screens, a resolution of 1920x1080 is generally sufficient, although you can opt for higher resolutions depending on your system.
Download and install LightCut from Google Play Store
With BlueStacks configured, it’s time to install LightCut. To do this, you’ll use the Google Play Store integrated into the emulator, similar to how you would on an Android device.
Access Google Play Store in BlueStacks
Open BlueStacks and click on the Play Store icon. If this is your first time accessing it, you’ll be prompted to sign in with your Google account. Complete the sign-in process to continue.
Search for and download LightCut
In the Play Store’s search bar, type LightCut and press Enter. The official app will appear in the results.
Click on it and select Install.
- Wait for the installation to complete. The duration will depend on your internet connection speed.
- Once installed, you’ll find the LightCut icon on the BlueStacks home screen.
Launch and configure LightCut in BlueStacks
With LightCut now installed, you can start exploring its features and edit videos directly from your computer.

Below, we show you some initial settings to enhance your editing experience.
Adjust the LightCut user interface
When opening LightCut for the first time, the app may display a quick introduction to its features. Follow the tutorial or skip it if you’re already familiar with the app.
To customise the interface, go to LightCut’s settings options within the app and adjust preferences such as export quality and default video format.
Import videos from your PC
BlueStacks allows access to local files on your PC, making it easy to import videos stored on your computer for editing in LightCut.
- To import a video, open LightCut and select Import from gallery. Choose the video you wish to edit.
- BlueStacks also allows you to drag files directly from your desktop to the emulator, which speeds up the process.
Following these steps will enable you to enjoy all the features and tools of LightCut on your PC, taking advantage of the ease of editing on a larger screen.
This method is especially useful for those seeking greater precision and comfort in their video editing projects, ensuring every detail stands out in the final work.
Leave a Reply
I appreciate your help!
★★★★★